Purpose
Sequence Step(s) answer two basic questions: “What is the machine doing now?” and “What is it waiting for before it can continue?”
Sequence Step(s) are latched state markers that record ordered progression through a PLC Pro Sequence. As each step is reached, its bit is latched TRUE and remains established as a record that the sequence has progressed through that point.
No Sequence Step is latched unless both OK to Continue and OK to Advance are TRUE. This is sufficient to establish Step 1. Each subsequent step also requires confirmation that the preceding step's ordered action is complete.
Once established, Sequence Step(s) remain latched through both sequence operation and interruptions. Normally, they are cleared only by Sequence Reset, typically by writing zero to the word or bit field containing the sequence steps.
Record Sequence Progression
Sequence Step(s) provide a retained record of how far a PLC Pro Sequence has progressed. As each step is reached, its bit is latched TRUE. Previous step bits normally remain latched as later steps are established, creating an orderly record of the points the sequence has reached.
Because the step bits accumulate as the sequence progresses, the highest-numbered Sequence Step that is TRUE normally identifies the current point in the sequence. The interval associated with that step continues until the next Sequence Step, or Normal Done for the final step, is established.
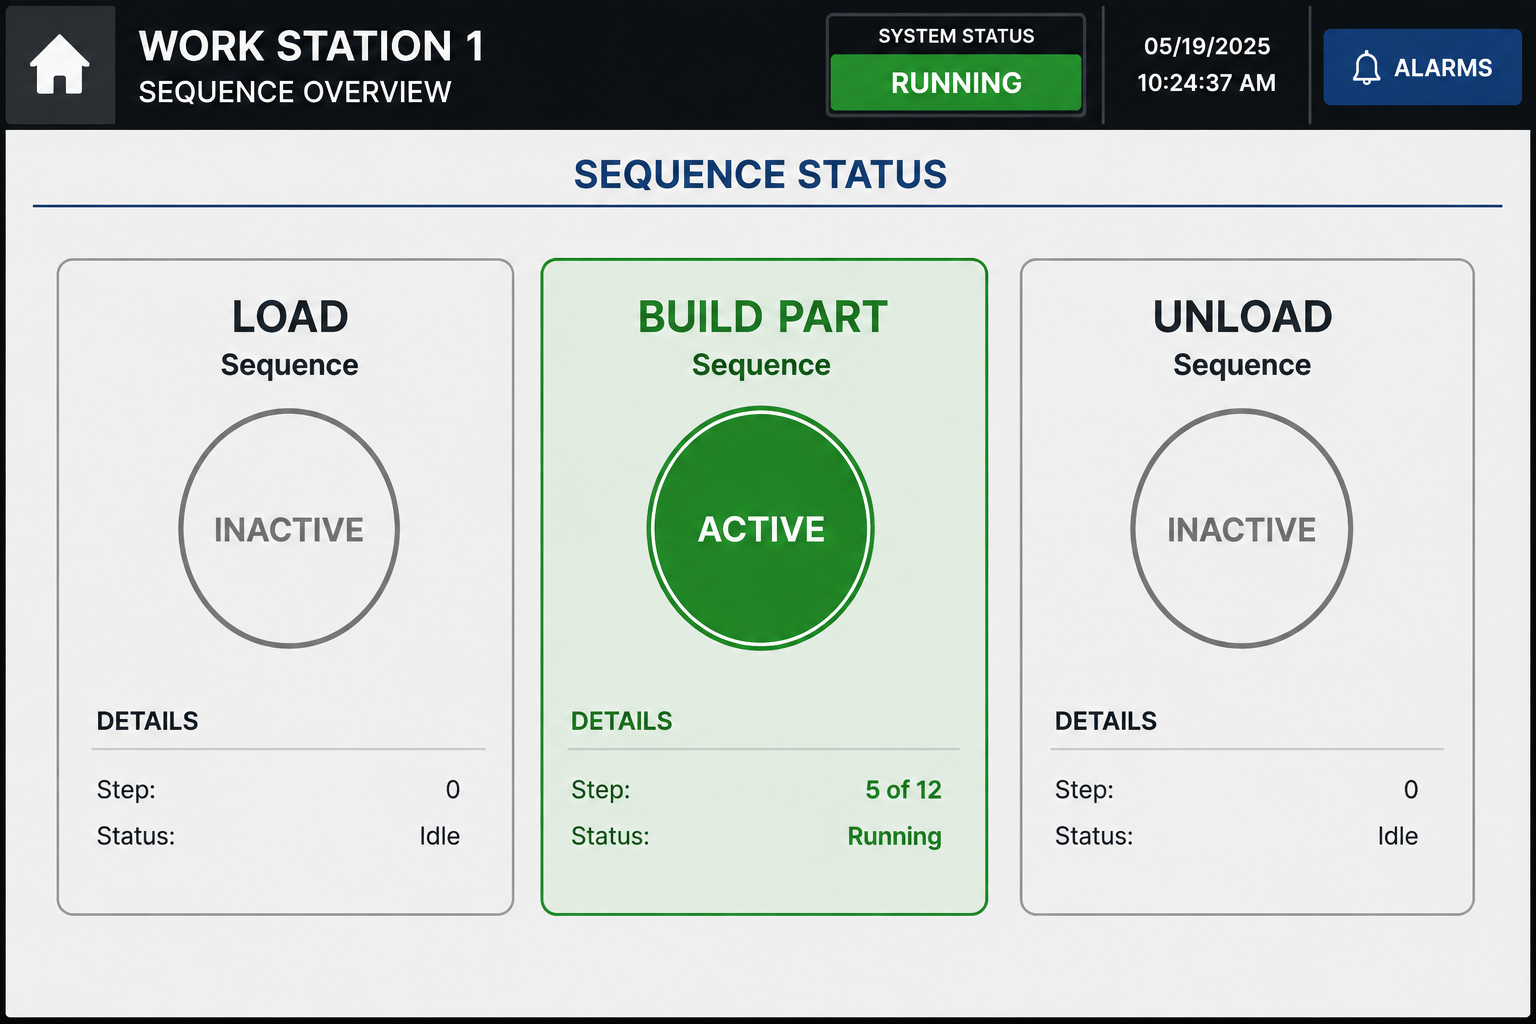
For example, using screen-based HMI, each Sequence Step in a PLC Pro Sequence moves a descriptive string into an HMI display string at the moment the step is established. Figure 1 shows how this information can be presented along with the status of other sequences in the installation. The message typically describes what the sequence is expecting to confirm that the new step's ordered action is complete. During normal operation, some steps may advance so quickly that the messages are barely visible. If a step fails to complete, however, no subsequent step replaces the message, so it remains plainly displayed and provides an immediate diagnostic.
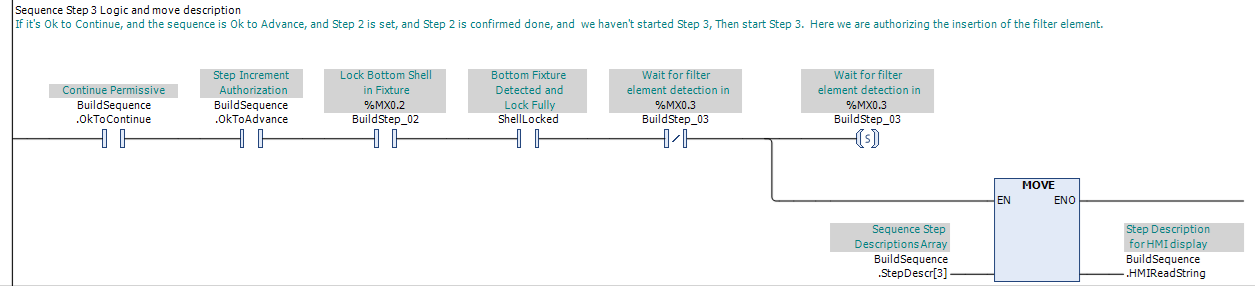
In the standard PLC Pro Sequencing method, the same rung that establishes the Sequence Step also moves that step's description into the HMI display string. The displayed message therefore changes only when another step is established, leaving the current diagnostic information in plain view whenever sequence progression stops.
Using the method described above, Normal Done moves a sequence-complete message into the HMI display string, and Sequence Reset moves an idle message into the same display string. When step descriptions are stored in an indexed array, PLC Pro Sequences commonly use index 31 for the done message and index 0 for the idle message.
Individual Sequence Step(s) may also be timed when a particular ordered action warrants separate monitoring. The timer runs during that step's active interval and provides a warning if the required completion condition is not received within the expected time. This can identify a problem promptly without waiting for an overall sequence warning.
For example, a PLC Pro Sequence that normally takes twenty minutes may include an early Sequence Step whose ordered action should complete within ten seconds. Timing that individual step allows the control program to identify a problem with that action almost immediately, rather than waiting for the overall sequence warning to indicate that the entire sequence is taking too long.
Establish Sequence Steps
Every Sequence Step requires both OK to Continue and OK to Advance to be TRUE before it can be established. These conditions ensure that the sequence is permitted to continue operating and is currently authorized to advance.
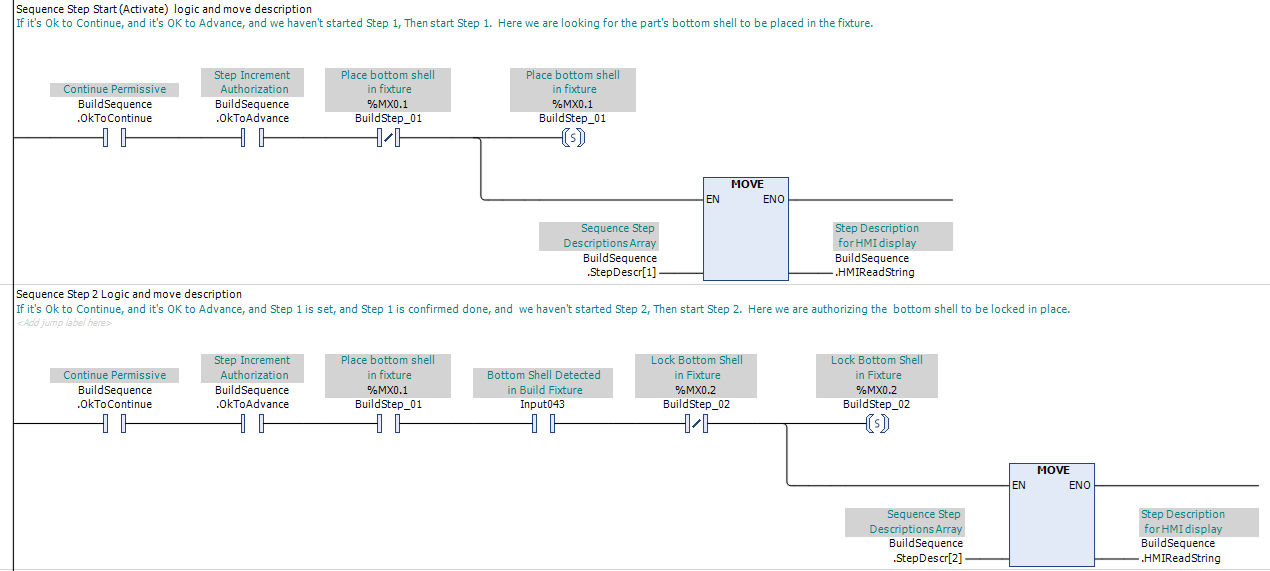
Step 1 requires no preceding step or preceding action to be complete. When OK to Continue and OK to Advance are TRUE, and Step 1 has not already been established, Step 1 is set.
Each subsequent Sequence Step requires the preceding step to be established and confirmation that the preceding step's ordered action is complete. When those conditions, OK to Continue, and OK to Advance are all TRUE, and the new step has not already been established, the new step is set.
Confirmation that the preceding step's ordered action is complete may come from a limit switch, proximity sensor, timer, analog value, operator confirmation, communication handshake, or any other condition that establishes that the required result has been achieved.
Direct confirmation of the ordered action is preferred, but it is not always available. When suitable feedback has not been provided, elapsed time may be used as the step-completion condition. In that case, the timer confirms only that sufficient time has been allowed for the ordered action to complete; it does not directly confirm that the required physical result was achieved.
If the required completion condition does not occur, the next Sequence Step is not established. The sequence remains at its current point until the required completion condition is satisfied or Sequence Reset clears the sequence.
Sequence Step rungs are programmed consecutively in sequence order so the entire sequence can be followed directly through the ladder logic.
Reset Sequence Steps
Once established, Sequence Step(s) remain latched through both sequence operation and sequence interruptions. As a rule, they are cleared only by Sequence Reset.
PLC Pro Sequences commonly store the Sequence Step(s) as individual bits within a word or other contiguous bit field. This provides a compact sequence structure and allows all of the established steps to be cleared together by writing zero to that word or bit field during Sequence Reset.
Some development environments do not support individual bits within a word as cleanly. When bit addressing, documentation, or maintenance becomes unnecessarily cumbersome, the Sequence Step(s) may instead be declared as individual Boolean variables. The representation changes, but the sequencing method does not.
See Sequence Reset for the method used to clear Sequence Step(s) and the other sequence-control states.
PLC Pro Design Rules
- The first step is normally set (latched) on the same scan that OK to Advance is set.
- Every step must be conditioned by OK to Continue and OK to Advance.
- Sequence Steps must be latched (set), not held TRUE by ordinary direct assignment.
- Every step must verify that it is not already TRUE before it is latched.
- Each subsequent step must wait for a defined completion condition from the preceding step's call for action.
- Prefer direct confirmation of step completion; use elapsed time as a last resort when suitable feedback is unavailable.
- Once latched, Sequence Steps remain TRUE until Sequence Reset.
- Program Sequence Step rungs consecutively in sequence order.
- Individual Sequence Step(s) may be timed to warn when expected completion time is exceeded.
- Where a screen is available, move the step description to the display string on the same rung that sets the Sequence Step.
- Where a screen is available, each Sequence Step should describe what the next sequence step is waiting for.
Diagnostics
Sequence Step(s) are one of the most powerful troubleshooting tools in the PLC Pro arsenal. Because the step rungs are programmed consecutively and remain latched as the sequence progresses, a technician can scan down the ladder to the first step that is not TRUE and immediately see the completion condition preventing the sequence from advancing.
Where a screen is available, the same diagnostic is presented directly to the operator. The current Sequence Step description identifies what the sequence is waiting for before the next step can be established, often allowing the problem to be identified without opening the program.